
Thursday, April 10, 2014


Saturday, April 14, 2012
Through a Keyhole
In this GIMP project, you will learn how to use layers, selection tools, the stroke dialog, and filters in creating the effect of looking through a keyhole.

Start by creating a new image 600 pixels wide by 800 pixels high. Open the image that you want to appear through the keyhole as a new layer, File > Open as Layers… . Note: It may be necessary to scale and/or reposition this image to get the best effect.

- Making the keyhole.
Create a new layer, brass, on top. With the Bucket Fill Tool, fill it with a brass-like color. I used #8a4500.

Set gridlines every 25 px in the Preferences panel, Edit > Preferences. In the View menu, turn on Show Grid (the box is checked).
Using the Paths Tool, draw a tall, narrow trapezoid, as shown below, to be the lower part of the keyhole. Suggestion: Dragging out guides can make the selections easier.

Now, in the Tool Options click the Selection from Path button to turn the path into a "marching ants" selection.

With the Ellipse Select Tool (in Add to the current selection mode) draw a circle to be the top portion of the keyhole as shown below.

Be sure brass is the active layer. Clear the contents of the keyhole-shaped selection, Edit > Clear. In the View menu, turn of the grid and guides.

- Putting a slight edge around the keyhole.
Create a new layer named edge on top. Make sure edge is the active layer and stroke the selection, Edit > Stroke Selection…, click the radio button for Stroke with a paint tool, and choose Paintbrush from the drop-down menu. In the Tools pallet, select a paintbrush of about 3 pixels. Set the color to a very dark brown (#532a00). Finally, in the Stroke Selection dialog, click Stroke.

- Put a little bit of shadow inside the edges of the keyhole.
Make a new layer on top, inside shadow. Using Stroke Selection again, chose the Stroke line style, a width of about 15 px, and solid default black, click Stroke. Then, remove the selection, Select > None.

Apply a Gaussian blur with a radius of about 35, Filters > Blur > Gaussian blur… . Drag the inside shadow layer immediately under the brass layer. Decrease the opacity to about 75-80%.

- Add some shadow through the keyhole.
Create a new layer above the inside layer, name it gradient, and fill it with black using the Bucket Fill Tool. Add a layer mask to the gradient layer, right-click the layer in the Layers pallet and select Add Layer Mask… .

Select the Blend Tool and choose a black-to-white radial gradient. Drag the Blend Tool vertically downwards in the lower portion of the keyhole to reveal the inside layer. You may have to experiment a few times to get a good result. Decrease the opacity to about 75%.

As they say in Montreal, “Voila!” There are numerous opportunities for modifications and variations in this project, so be bold and have fun!
Thursday, February 23, 2012
The Poirot Effect
This project was inspired by the opening of the British TV series Poirot. I've always thought the graphics used were very dramatic and interesting, so, I decided to try to create a similar effect using GIMP.

Some of the things you will do in this project:
- Draw a path and make a selection from it
- Open an image as a new layer in the current image
- Scale a layer
- Use guides
- Apply a layer mask
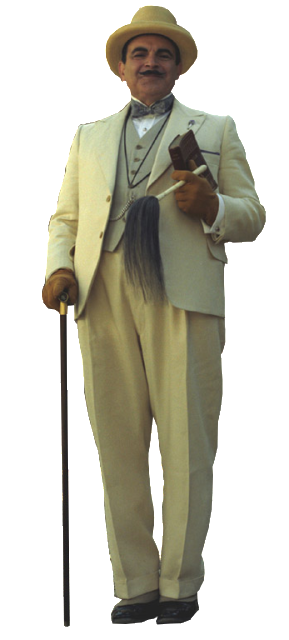
Download these source images before you begin: Poirot | OHVLamp
Create a new image 800 pixels tall by 600 pixels wide. Fill it with default black using the Bucket Fill Tool. Drag out vertical guides to 525, 310, 290, and 75 pixels. Pull down horizontal guides to 650 and 125 pixels.

Step 1. The light cone
Choose the Paths Tool. Draw a tall trapezoid with corners at 290, 125; 75, 675; 525, 675; and 290, 125. In the Tool Options, click on the Selection from Path button. Create a new transparent layer named Cone. Use the Bucket Fill Tool to fill the selection on the Cone layer with white. Then deselect, Select > None.

Step 2. The light fade
Add a white layer mask to the Cone layer, Layer > Mask > Add Layer Mask… . Using the Blend Tool, draw a black-to-white gradient up from the bottom of the trapezoid. You may have to experiment a few times to get the best effect. I went from 675 pixels up to 400 perpendicular to the base of the image.
i

Step 3. The oval of light on the floor
Choose the Ellipse Select Tool. Draw a white oval 450 pixels wide and 95 high. Make a new transparent layer, Oval. Fill the selection on this layer with white. Deselect. Use the Move Tool to center it over the lower horizontal guide.

Step 4. Hercule
Open the Poirot image as a new layer in the image, File > Open as Layers… . From the Layer menu, choose Scale Layer… , and scale it down to an appropriate size (I used 25%). Position this layer so that the feet are in the center of the light oval.

Step 5. Poirot's shadow
Add a new transparent layer, name it Shadow. With the Ellipse Select Tool, draw an oval around Poirot's feet. Fill it with black using the Bucket Fill Tool. Deselect. Select the Rotate Tool and turn it a little clockwise, about 5 degrees. You may need to adjust the position a bit with the Move Tool.

Apply a Gaussian blur with a Radius of of about 45, Filters > Blur > Gaussian Blur… . Drag the Shadow layer under the Poirot layer. Turn down the opacity to about 85%.

Step 6. The overhead lamp
Open the OHVlamp image as a new layer on top of all the other layers. Scale it down to an appropriate size (I used 30%). Position it over the top of the light cone.

Adjust the Brightness-Contrast from the Color menu, Brightness: -100, Contrast: 30.

Extension
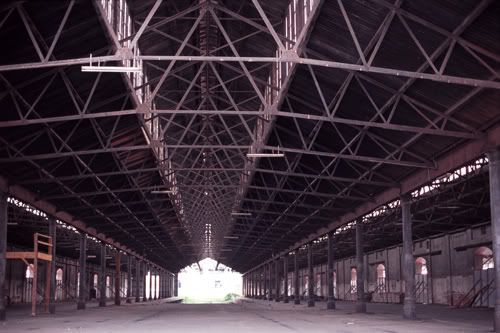
If you wish to continue, download this image: Industrial
http://i221.photobucket.com/albums/dd67/xmath_photos/GIMP%20Blog/Poirot%20Light/Industrial.jpg
Open the Industrial image as a new layer and drag it immediately above the Background layer in the Layers pallet. Scale the Industrial layer to fill the image above the lower horizontal guide.

Set the blending Mode to Lighten Only and slide the Opacity all the way down to 13.

From the View menu hide the guides. That’s it.

Sunday, August 15, 2010
The Catch
Before

After

Some of the things you’ll do in this project ...
- Use a guide
- Adjust shapes with the Perspective tool
- Clear the contents of a selection
- Feather, shrink, and invert selections
- Hide a layer
- Use the Eraser tool
1. First, drag a guide down from the top ruler to define the location of the top of the "frame".

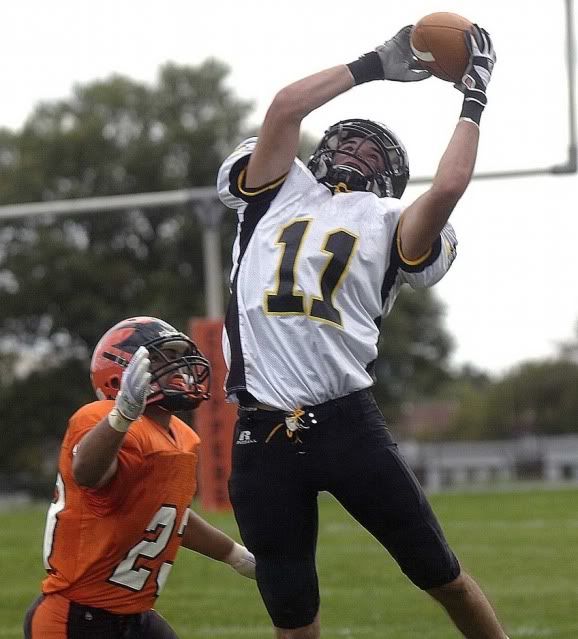
2. Now, the tedious part. Select the portion of the football player above the guide (which will be outside of the "frame") and a small portion below the guide. I used the Extraction tool and refined the selection using a Quick Mask. The details of making this selection are not within the scope of this lesson.

3. Choose the Rectangle Select tool and click on the "Add to selection" mode icon.

Select the entire region between the guide and the bottom of the image, invert the selection, and feather it 3 pixels.

4. Create a new layer named "black" and fill the whole selection with default black using the Bucket tool.

In the next step, you'll define the "picture frame."
5. With the Rectangle Select tool in Normal mode, select the entire region below the guide again. Use the Perspective tool (be certain to choose the modify selection icon), to reshape the selection into a trapezoid.
 See how to do this in a short video
 6. Invert this selection. Use the Pencil tool to paint the areas to the left of, right of, and below the "frame" default black.

7. Create a new layer, "white." Fill the trapezoidal selection with default white.

8. Shrink the selection by 35 pixels. Using the Perspective tool again, adjust this trapezoid to give the appearance that the the top border of the "frame" is farther from you than the bottom edge.
9. Clear the white fill from the inner selection, Edit > Clear.

All that remains is to delete the part of the white "frame" that covers the leaping player.
10. Hide the "white" layer (click the "eye" in the Layers palette). Use the Lasso tool to select the portion of the football player which is under the border (be generous). Be sure to accurately select the left and right edges of the player. Feather the selection by 3 pixels. I chose to do this in pieces, but you could do it all at once.

11. Make the "white" layer visible again (be sure it's the active layer). Use the Eraser tool to remove the selected area of the white border from over the player.
That's it!

Dolphins and whales are great subjects for this effect. I think you could do some nice things with basketball players and soccer goalies, too. Have fun!
Friday, July 31, 2009
Create a Bright Neon Pattern of Repea...

To complete this exercise you will need to have the GIMP Layer Effects plug-in installed. If you don't have it, you can download it here.
You will also need a simple black-and-white line art shape like these ...
Download either shape or use one of your own. I chose to use the star shape.


Some of the things you'll do in this lesson ...
- Use the Layer Effects tools
- Paste as a new layer
- Move layers
- Rename layers
- Hide and show layers
- Merge layers
- Use the Select by Color tool
- Shrink a selection
- Use guides
1) From the image menu, click Image > Image Properties to get the dimensions of your chosen shape image. As you see, the star image is 479 pixels high by 455 pixels wide.

2) You're going to create a new image (File > New...) based on multiples of these dimensions. To get the height of the new image, multiply the star's height by 1.2. 479 x 1.2 = 575. The width of the new image is 4 to 6 times the width of the shape to allow plenty of room to work. If you multiply the star's width (455) by 6, you'll get 2730, or about 2800 pixels.

3) Now return to the star image. Use the Select by Color tool to select the black star shape.

4) Then shrink the selection by 3 pixels, Select > Shrink... .

5) From the star's image menu select Edit > Copy.

6) Now switch to your new image and paste the star as a new layer, Edit > Paste as > New Layer.

You should now see the pasted layer in the upper left corner of the new image.

If, as in the screenshot above, you aren't seeing all of the new image in the window, the key combo Ctrl-Shift-E will fit the entire image into the window.
8) Use the Move tool to slide the star to the right edge of the image and position it roughly vertically centered.

At this point you should rename this layer in the Layers Palette to make things easier to keep sorted out. Double-click on the name "Clipboard" in the layer list and rename it as "blue".

9) drag a Guide down from the top ruler to help you align the rest of the stars.

Now you can begin creating the neon effects using the Layer Effects plugin.
10) First you'll give the star a bright blue outer glow. Script-Fu > Layer Effects > Outer Glow...


Set the Size: to 8 and use the other defaults.
12) Next comes the inner shadow using a darker shade of blue, Script-Fu > Layer Effects > Inner Shadow... . Click on the color swatch in the Inner Shadow dialog, choose a darker shade of blue. I used 00008a. Set the Size: to 8 and use the other defaults.
13) The next step is to merge the three layers of the blue star into a single layer. Make the Background layer invisible by clicking on the eye next to it in the Layers Palette. Right-click on any of the visible blue layers and select Merge Visible Layers... . Use the default settings.

There should now be just a single blue layer. Make the Background layer visible again by clicking where the eye should be.

This is what you should have right now, the black star with a blue glow around it.

Your next task will be to add a second star with a green glow.
14) Repeat step 6 to get another star and position it with the Move tool. Judge the amount of overlap you'd like to your taste. (You should not need to copy the star from the original image again. It should remain on your clipboard throughout this exercise.)
15) Rename this layer "green" as shown previously in step 8.
16) Repeat step 10 to open the Outer Glow dialog.
17) Click the color swatch and choose a bright green. In the example I used 0bf805. The Size: should again be 8, other settings are defaults.
18) Do the inner shadow as in step 12 using a darker shade of green (144716).
19) Hide the non-green layers and merge the three green layers into a single layer (See step 13).

You should now see two completed stars in the new image when you make all the layers visible again.

Continue this process until you've added as many shapes as you like to your new image.
To finish up, you need to paint the Background layer black with the Bucket Fill tool. You may be wondering why I didn't simply create a black background in the first place. I could have done, but manipulating the black stars on a black background ..., well, you see the point :-).
20) Be sure the Background is the active layer in the Layers Palette, the default color swatches are shown in the Toolbox, and the selected Fill Type is FG Color Fill. Now paint the Background layer.

22) Finally, in the View menu, uncheck Show Guides.

You likely have a bit of unused canvas so you'll probably want to crop the image to suit your needs. In the immortal words of Porky Pig,"That's all, f-f-f-folks!"
Hopefully, you've learned something new in this tutorial. If you found it useful, please share it with others. Any constructive comments are appreciated as well as donations through PayPal.