This project was inspired by the opening of the British TV series Poirot. I've always thought the graphics used were very dramatic and interesting, so, I decided to try to create a similar effect using GIMP.

Some of the things you will do in this project:
- Draw a path and make a selection from it
- Open an image as a new layer in the current image
- Scale a layer
- Use guides
- Apply a layer mask
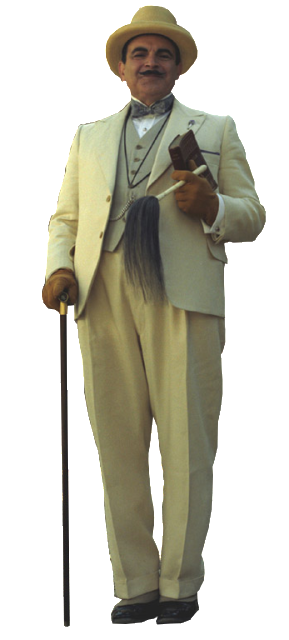
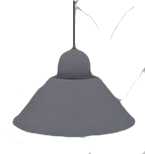
Download these source images before you begin: Poirot | OHVLamp
Create a new image 800 pixels tall by 600 pixels wide. Fill it with default black using the Bucket Fill Tool. Drag out vertical guides to 525, 310, 290, and 75 pixels. Pull down horizontal guides to 650 and 125 pixels.
 img: pult01
Step 1. The light cone
Choose the Paths Tool. Draw a tall trapezoid with corners at 290, 125; 75, 675; 525, 675; and 290, 125. In the Tool Options, click on the Selection from Path button. Create a new transparent layer named Cone. Use the Bucket Fill Tool to fill the selection on the Cone layer with white. Then deselect, Select > None.

Step 2. The light fade
Add a white layer mask to the Cone layer, Layer > Mask > Add Layer Mask… . Using the Blend Tool, draw a black-to-white gradient up from the bottom of the trapezoid. You may have to experiment a few times to get the best effect. I went from 675 pixels up to 400 perpendicular to the base of the image.
i
Step 3. The oval of light on the floor
Choose the Ellipse Select Tool. Draw a white oval 450 pixels wide and 95 high. Make a new transparent layer, Oval. Fill the selection on this layer with white. Deselect. Use the Move Tool to center it over the lower horizontal guide.

Step 4. Hercule
Open the Poirot image as a new layer in the image, File > Open as Layers… . From the Layer menu, choose Scale Layer… , and scale it down to an appropriate size (I used 25%). Position this layer so that the feet are in the center of the light oval.

Step 5. Poirot's shadow
Add a new transparent layer, name it Shadow. With the Ellipse Select Tool, draw an oval around Poirot's feet. Fill it with black using the Bucket Fill Tool. Deselect. Select the Rotate Tool and turn it a little clockwise, about 5 degrees. You may need to adjust the position a bit with the Move Tool.

Apply a Gaussian blur with a Radius of of about 45, Filters > Blur > Gaussian Blur… . Drag the Shadow layer under the Poirot layer. Turn down the opacity to about 85%.

Step 6. The overhead lamp
Open the OHVlamp image as a new layer on top of all the other layers. Scale it down to an appropriate size (I used 30%). Position it over the top of the light cone.

Adjust the Brightness-Contrast from the Color menu, Brightness: -100, Contrast: 30.

Extension
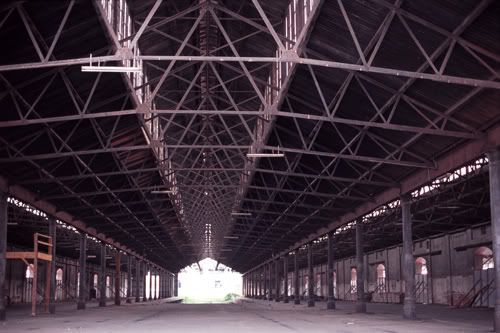
If you wish to continue, download this image: Industrial
http://i221.photobucket.com/albums/dd67/xmath_photos/GIMP%20Blog/Poirot%20Light/Industrial.jpg
Open the Industrial image as a new layer and drag it immediately above the Background layer in the Layers pallet. Scale the Industrial layer to fill the image above the lower horizontal guide.

Set the blending Mode to Lighten Only and slide the Opacity all the way down to 13.

From the View menu hide the guides. That’s it.

1 comment:
Glad to see you're back in business, Tom! Thank you for the tutorial!
Post a Comment