Hello Bar

Sunday, September 5, 2010

Attack of the Clones!

In this easy lesson, you will learn how to create an image which appears to show the same person appearing in multiple locations in a scene.
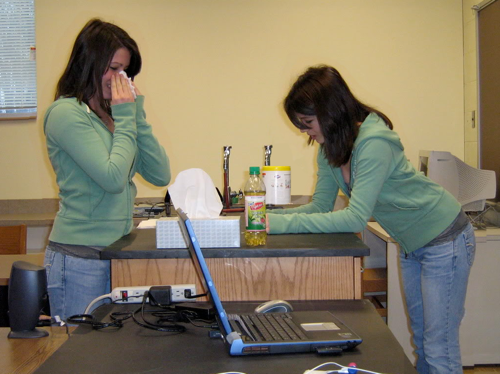
kaileeproj-08-1.png

Ideally you would begin with a photo of the scene without the person in it to use as the background image.
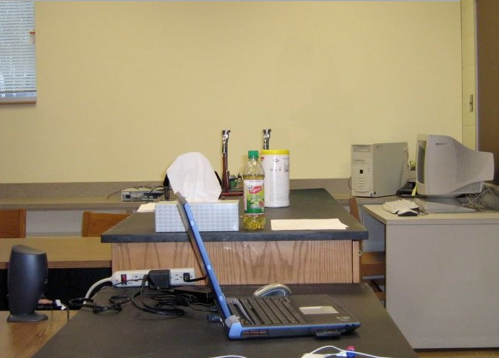
kaileeproj-empty.png

You will need at least two pictures of the same scene with the person you plan to clone appearing in a different location in each photo.

Tip: For best results, set up the camera using a tripod and keep its position and settings fixed for all the photos.

Download source images here:

empty background | girl left | girl right | girl back

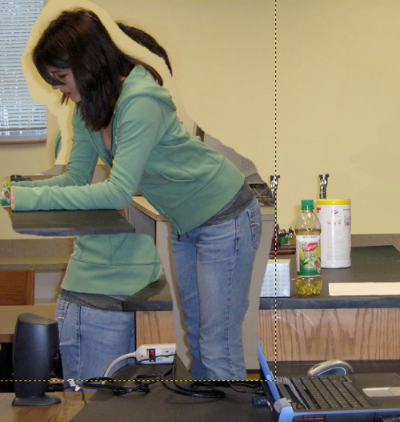
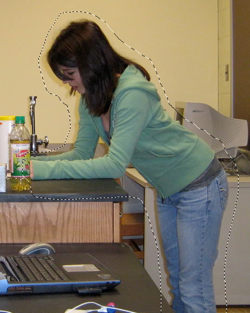
Step 1. Using the Free Select Tool (Lasso) roughly select the person you plan to clone in one of the photos in which she appears. Feather the selection by a few pixels, Select > Feather...
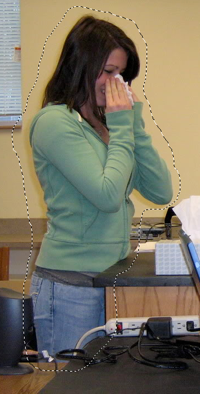
kaileeproj00L-02.png

The selection needn't be precise. In fact, having some of the surrounding content makes it easier to properly position the pasted layer.

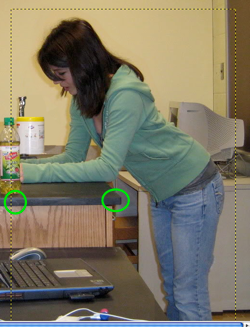
Step 2. Copy the selection,Edit > Copy, then paste it into the background image as a new layer, Edit > Paste as > New Layer.
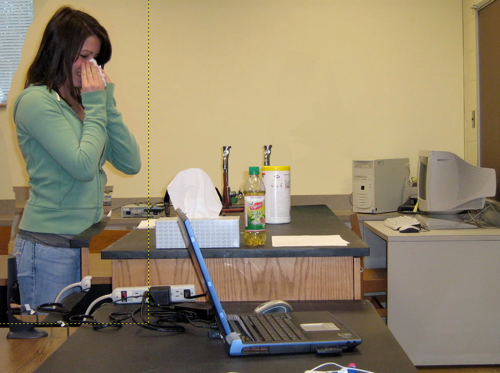
kaileeproj-03.png

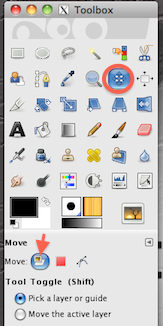
Step 3. Use the Move Tool (in Layer mode) ...
move_tool.png

... to properly position the clone over the background. Zoom in and use some key points to accurately align the clone layer.
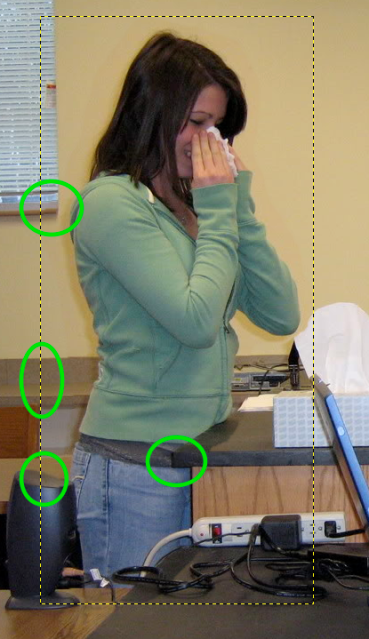
kaileeproj-04.png

Repeat Steps 1-3 to copy, paste, and position the person you are cloning from an image in which she appears in a different place.

Step 1
kaileeproj-05.png

Step 2

kaileeproj-06.png

Step 3

kaileeproj-07.png

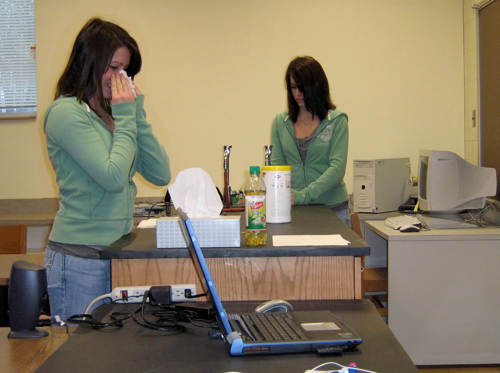
You now have a picture in which the same person appears in two different places!

kaileeproj-08-1.png

If you have more photos of your person, try placing her in various locations in the scene to get the most interesting results.
kaileeproj-09.png

The challenge comes when one of your clones is to appear in front of another. In this case, your selection must be precise in the areas where the forward clone layer overlays the rear one. But, you can create a really interesting effect this way.

kailee_3_a_sml.jpg

Imagine and Create!!!

Sunday, August 15, 2010

The Catch

In this lesson, you'll use a number of GIMP's tools to create an effect in which a football player "leaps" out of a "picture frame" to catch the ball.

Before


After


Some of the things you’ll do in this project ...
  • Use a guide
  • Adjust shapes with the Perspective tool
  • Clear the contents of a selection
  • Feather, shrink, and invert selections
  • Hide a layer
  • Use the Eraser tool
Download the original image here or use one of your own.

1. First, drag a guide down from the top ruler to define the location of the top of the "frame".

2. Now, the tedious part. Select the portion of the football player above the guide (which will be outside of the "frame") and a small portion below the guide. I used the Extraction tool and refined the selection using a Quick Mask. The details of making this selection are not within the scope of this lesson.

3. Choose the Rectangle Select tool and click on the "Add to selection" mode icon.

Select the entire region between the guide and the bottom of the image, invert the selection, and feather it 3 pixels.


4. Create a new layer named "black" and fill the whole selection with default black using the Bucket tool.
Deselect everything, Select > None.


In the next step, you'll define the "picture frame."

5. With the Rectangle Select tool in Normal mode, select the entire region below the guide again. Use the Perspective tool (be certain to choose the modify selection icon), to reshape the selection into a trapezoid.
See how to do this in a short video

6. Invert this selection. Use the Pencil tool to paint the areas to the left of, right of, and below the "frame" default black.


7. Create a new layer, "white." Fill the trapezoidal selection with default white.

8. Shrink the selection by 35 pixels. Using the Perspective tool again, adjust this trapezoid to give the appearance that the the top border of the "frame" is farther from you than the bottom edge.

9. Clear the white fill from the inner selection, Edit > Clear.

All that remains is to delete the part of the white "frame" that covers the leaping player.

10. Hide the "white" layer (click the "eye" in the Layers palette). Use the Lasso tool to select the portion of the football player which is under the border (be generous). Be sure to accurately select the left and right edges of the player. Feather the selection by 3 pixels. I chose to do this in pieces, but you could do it all at once.


11. Make the "white" layer visible again (be sure it's the active layer). Use the Eraser tool to remove the selected area of the white border from over the player.

That's it!


Dolphins and whales are great subjects for this effect. I think you could do some nice things with basketball players and soccer goalies, too. Have fun!

Monday, June 7, 2010

Old Blue Eyes


Using GIMP's Filter Pack it's easy to change someone's eye color to almost anything you like. In this exercise you'll change the girl's green eyes to a bright blue.


In this lesson ...
  • Use the Free Select Tool
  • Subtract from/add to the current selection
  • Use the Filter Pack

Download the original image I used from stock.xchng

Zoom in to the girl's right eye. Using the Free Select Tool (Lasso) select the outer perimeter of the iris.


IMPORTANT:  In the Toolbox, click on the Subtract from the current selection icon.


Again, using the Free Select Tool, draw a selection around the pupil. This cuts that region out of the selection. Feather the selection by 1 or 2 pixels, Select > Feather...


The selected region should only be the colored iris.


Now use the Filter Pack to modify the color of the iris, Colors > Filter Pack… You'll see the original selection and the modified selection which, at this time, are the same. Check Hue under Windows.


The Hue Variations window opens showing six possible changes to the iris. Click on Blue.


The Hue Variations window now shows six new possible hues for the iris. Choose the Cyan variation.


This is the color you're looking for, so click OK in the Filter Pack Simulation window to see the new eye color applied in the image.


I've only modified one eye for illustration purposes. You would obviously want to apply this method to both eyes. Use the Add to/Subtract from the current selection options to select the irises of both eyes.


The Filter Pack can be a fun tool with which to play and experiment. You can use it to alter the color of anything without affecting the light and shadows.

Tuesday, March 16, 2010

Moon Shadow

"I'm being followed by a moon shadow
moon shadow-moon shadow
leaping and hopping on a moon shadow
moon shadow-moon shadow"
- Cat Stevens

I had a request to show how an extracted image can be placed on a plain background with a realistic shadow. As always, there are different ways to accomplish this. This, I think, is a relatively simple and straight-forward method.


Skills used in this lesson…
  • Paste as new layer
  • Using the Move tool
  • Scale the layer to the image size
  • Using Guides
  • Feathering a selection
  • Using the Blend tool
  • Rearranging layers

Download the source image here or use one of your own.

Selecting and copying the moon from the source image are not a part of this tutorial. Assume you are ready to paste the copied selection into a new image.

So, you'll need to create a new image larger than the object you're going to paste. In this example, the new image is 900 by 900 pixels with a default white background.

Paste the moon into your new image as a new layer named "moon", Edit > Paste as… > New layer
Use the Move Tool to position the object so that it is about horizontally centered and a bit above the vertical center.


Scale the size of this layer to match the overall size of the image, Layer > Layer to image size

Drag in vertical guides to mark the left and right edges of the moon. Place horizontal guides to mark the bottom and middle of the moon.

The guides form a rectangular box containing the bottom half of the moon. Use the Ellipse Select Tool to make a selection bounded by that rectangle.


See how to do this in a short video


Feather the selection by about 50 pixels, Select > Feather…

Create a new transparent layer named "shadow".

Set the Background color to a dark gray. I used 626262.

Be sure the "shadow" layer is active, highlighted in the Layers palette.


Choose the Blend Tool, settings FG to BG, linear gradient. Drag the Blend Tool from the top left corner to the bottom right corner of the rectangle formed by the guides.


See how to do this in a short video


You can remove the selection and the guides now.

With the Move Tool, drag the "shadow" layer down and to the right a bit.

Right now the "shadow" layer should be the top layer in the Layers palette. Drag it down so that it is under the "moon" layer (but above the background layer).


To finish, I cropped the image, then filled the background layer with a light blue color (95c0f1). Flatten the image if you want to save it as a .jpg or .png file.


The basic techniques of this procedure are presented here without regard for the finer aesthetic points. Refining the image for its best, most realistic appearance is left to you.

If you have found these lessons to be helpful and worthwhile, a small donation via PayPal (Please use the button on the left) would be very much appreciated.

Monday, March 1, 2010

Responding to Comments

Some of you have posted comments in which you have asked questions about the tutorials. I have not responded to these because I had not been aware of them. Though I have very little time to devote to this blog, I plan to try to do a better job with this.

I have made some changes to the commenting and comment notification procedures that I hope will help in this. Please bear with me.

I appreciate those of you who visit here whether regularly or just occasionally. I'd love to do more tutorials. Good tutorials take a lot of time, and I just can't fit them in very often. I have many notes on tutorials for the future. Ahh, maybe someday.

Just Too Big!


Some things, like the Eiffel Tower, are just too big to fit in the borders of a single picture! In this fairly easy exercise, you'll learn how to make it appear as though the tower was photographed in three separate images which have then been laid out on a table.

Among the skills used in this lesson …
  • Using guides
  • Pasting as a new layer
  • Stroking a selection
  • Rotating and moving layers

Download this picture of the Eiffel Tower by Tom Leadbeetter which I got at Stock.Xchng, or use a picture of your own.

Use Image > Image Properties to find the dimensions of your picture.


Create a new image 10% larger than the the original picture with a black (FG color) background.


Return to the original picture and drag guides down from the top to divide the image roughly into thirds.


See how to do this in a short video.

Use the Rectangle Select Tool to select and copy most of the bottom third of the original picture. Switch to the new image and paste this into it as new layer named "bottom", Edit > Paste as > New Layer.

Select the Move Tool and drag this to the bottom of the new image.


IMPORTANT: Swap the default color swatches.

Select the "bottom" layer, Select > All. Now stroke the selection to paint a white border around the "bottom" layer, Edit > Stroke Selection… Set the line width to 40 pixels.


Deselect everything, Select > None

Next choose the Rotation Tool, click anywhere on the "bottom" layer, move the center of rotation to the bottom left corner and rotate a bit counterclockwise, click the Rotate button to accept the change.


See how to do this in a short video.

Return to the original picture and select the middle portion of the tower (but not the full width of the picture). Copy this and paste it into your new image as a new layer named "middle", drag it to the middle of the new image.

Create a white border for the "middle" layer in the same way as you did for the  "bottom" layer.

Use the Rotation Tool to spin this layer slightly clockwise (place the center of rotation in the bottom right corner).

With the Move Tool position the "middle" layer slightly overlapping the "bottom" layer.


From the original picture select the top portion of the tower, copy it, paste it into the new image as a new layer, "top".

Once again, paint a border around this layer, tilt it a little counterclockwise, and move it to overlap the "middle" layer.


To complete the project, with the Crop Tool cut away some of the excess black background, then flatten the image, Image > Flatten image.
Now you can save it as a .png, .jpg, or whatever format you like, File > Save as…


Note: I exaggerated the rotations and overlapping a bit to accentuate the effect. You may not want to apply as much change in your own project.

A new feature has been added to this lesson, very short video clips to demonstrate some of the steps in the tutorial. Hope you like them.

I hope you find this, as well as my other tutorials, instructive and useful. I try very hard to create lessons that will be beneficial to both GIMP beginners and more advanced users. My aim is to make my tutorials complete, correct, and easy to follow.

If you have found these lessons to be helpful and worthwhile, a small donation via PayPal (Please use the button on the left) would be very much appreciated.